find my acronis sn
Acronis True Images 11
AMWUM-SEYR9-9T26N-EWQCP-J3MGA
VHRM4-3LMZV-ECGZJ-B42ZC-VL72A OR YUYFM-8Y6BK-293L9-GHBET-UYDJJ OR 96TLV-MXRHQ-4Q9CT-KGU3Z-WZ52F
VHX42-F3R54-2F77R-MEY5P-7CL92 OR Name: www.serials.ws Serial: 2SU6Q-GVHPM-A9RPM-QHZPB-Y49F3
Howto create a test PSU

Howto create a test PSU
Still got an old ATX PSU lying around and don't know what to do with it? Well maybe you could start using it as a 'test' PSU. To test your fans, cold cathodes are other modding stuff whenever you want, without having to boot up your PC. Now you might be thinking that this wouldn't be a problem, just plug in the power cable of the PSU and start the air/light show.. right?
Note : This howto is made for the newbies, most people will already know how to do this but I'm writing this for the newer people in the scene, so they also get the chance to know this :) Another IMPORTANT thing : this howto is completely at your own responsibility, if anything goes wrong, we aren't responsible. Normally nothing should go wrong but still look out, because you're 'messing' with the PSU.
Maybe you've already gave it a try in the past, but it doesn't work, your PSU really needs a motherboard before it can start running.. right? Nope it doesn't and this howto will show you how to do it without a motherboard.
Now first start searching for an ATX Power Supply Unit.
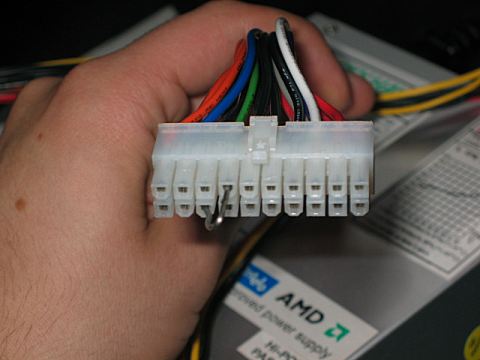
This is the motherboard connector, the connector on which all the magic is going to happen ;)
We also need a wire, or a paperclip I used the thingie that you see on the picture. Please make sure your PSU isn't plugged in while doing this mod! You might get a shock!
Overall this is a very easy mod, just search for the connector with the
green wire and insert an end from the paperclip. Then pick out one of the connectors with a
black (ground) wire and insert the other end of the paperclip.
After this I covered the motherboard connector with some tape, just to be safe in case anyone or anything touches it..
Now plug in the power cable of your PSU.. AND start running!! The PSU is going to blow!! Lol just a stupid joke ;)
Ok we're ready. This test PSU should be ideal for testing or showcasing some of your fans, cold cathodes or other devices to your friends!
Xbox360 notebook ?
微软的次世代游戏主机XBOX360以出众的游戏能力征服了许多游戏玩家的心,但是不能将家 用主机随时带在身边不能不说是一个很大的遗憾,许多追求便携性的玩家宁可选择笔记本电脑也不愿意选择需要搭配电视的游戏主机。不过也有玩家为了追求强大的 游戏性能和便携性,自己动手将XBOX360改造成了一台“笔记本电脑”。这位玩家将XBOX 360整合到一个笔记本电脑大小的机箱中,同时还安置了一面分辨率为1280×720像素的液晶屏幕,从外观上看,这就如同一部比较笨重的笔记本电脑,但 实质上它就是整合了键盘与屏幕的XBOX360游戏机。下面我们就跟随这位玩家的blog,一起来看看整个“改造”的全过程。

XBOX360 笔记本改造成品
在Blog的最开始,这位玩家用手绘的漫画表现了他在一个游戏主机店和主机商人的谈话过程,也说明了为何他要自己动手改造这台“笔记本版XBOX360”,从对话来看这位玩家对于索尼的PS3似乎不屑一顾。

手绘漫画

手绘漫画

手绘漫画

手绘漫画
买回XBOX360之后,这位玩家首先将它进行了拆解,只有具体了解了各个部分,才能做出满意的设计图。

XBOX360的主板

夸张的XBOX360散热器

外接SATA接口
由于要将XBOX360放入一个狭小的空间当中,但是XBOX360的处理器和显卡的高发热量,显然不能再用原装的散热器,所以这位玩家自己设计安装了一套水冷系统。

测试水冷管的密封性

特制的水泵
键盘制作是个比较麻烦的过程,由于要适应笔记本的造型和空间大小,所以键盘得重新设计制造,这位玩家采用了类似肤质的导电橡胶,并且画出了详细的键盘电路图,最后用厚厚的字典将粘合在一起的电路和导电橡胶压实。

专为“XBOX360笔记本”准备的导电橡胶

键盘电路图

用厚厚的字典将粘合在一起的电路和导电橡胶压实
找个宽屏显示器,把它拆了,改造好显示接口和IC控制线路,“XBOX360笔记本”的屏幕就有了。

显示接口改造

测试显示接口:正常

测试显示接口:正常

准备被拆的显示器

面板拆下来了

IC控制电路

IC控制电路

接好电源
现在开始就可以组装水冷散热器,并把它安装到XBOX360上了。

巨大的散热器鳍片

专门设计的挡板

强力胶水

把水泵和散热片连接起来

XBOX360的处理器

安装水冷设备

安装水冷设备
一切零件准备就绪之后,需要的就是一个外壳了。

平面设计图

完成这个需要具备金属加工能力

扳金

打孔

基本成型

改造者和他的朋友

组装和测试

组装和测试

组装和测试

组装和测试

组装和测试

组装和测试

组装和测试

组装和测试

XBOX360 笔记本改造成品
XBOX360 笔记本改造成品

XBOX360 笔记本改造成品

XBOX360 笔记本改造成品

XBOX360 笔记本改造成品

XBOX360 笔记本改造成品

XBOX360 笔记本改造成品

XBOX360 笔记本改造成品

XBOX360 笔记本改造成品

XBOX360 笔记本改造成品
XBOX360 笔记本改造成品